 |
| About Alan |
| Tutorials |
| Free files |
| Win9x FAQs |
| E-mail Alan |
| |
| Articles |
| BIV articles |
| Archive |
| Other articles |
| Archive |
| |
 |
|
|
Another
Hard Drive Disaster End Happily (Thanks to Time Machine)
by Alan Zisman (c) 2009 First published in Low End Mac October 29 2009, ZisMac column Back in August, in Computer Disaster Ends Happily, I wrote about how my wife was complaining that her iMac was running very, very slowly. When I took a look at it, I suspected the hard drive needed replacement. Because it's hard to access the guts of that model, I let my local Mac dealer install a new drive and OS X. The happy-ever-after part, though, was how easy Apple had made it to use the Time Machine backup on an external USB drive and get everything back - but working quicker than ever and with lots more free space on a replacement drive with twice as much room as the original. Less that three months later, another hard drive failed. No, not the new drive on my wife's iMac, but the drive on my Unibody MacBook. That machine's only 10 months or so old, but the drive isn't on warranty - I had replaced the original 160 GB hard drive in April with a 500 GB drive sent to me for review by a manufacturer. Besides lots more room, that drive promised speed, running at 7200 rpm compared to the 5400 rpm of the original drive, and it added shock resistance. Despite the promises, it stopped working with no warning the middle of one day; the Mac wouldn't boot up. I booted to an OS X install disc and ran Disk Utility - it claimed it couldn't repair anything on the drive. (I'm apparently not the only one with multiple hard drive failures - recently Christina Tynan-Wood wondered on InfoWorld "Have Hard Drives Become Less Reliable?") 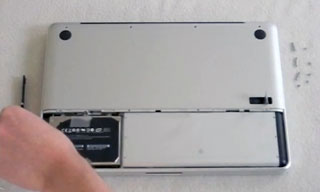 When I popped the 500 GB drive into my
MacBook, I put the original drive in a drawer - and so I was able to
pop it back in. Nicely, the aluminum MacBook makes it very quick and
easy to replace the hard drive in less than 5 minutes: When I popped the 500 GB drive into my
MacBook, I put the original drive in a drawer - and so I was able to
pop it back in. Nicely, the aluminum MacBook makes it very quick and
easy to replace the hard drive in less than 5 minutes:Easy! Too bad Apple's newer models - the ones with the long-life but unremovable batteries - don't make it this easy. The drive was just as it had been when I'd replaced it last April - ready to boot up and go, though missing six months worth of data and software updates - making my computer immediately usable, if a bit tight for space compared to what I'd become used to. (I was able to put the old, failed drive into an external USB case; when I connected it to the MacBook, the system noted that it could read the drive but not write to it and suggested I format it as soon as possible - but this let me access my last six months worth of data. Now that I'm done with it, I've formatted it - it seems to work, but I'm not going to trust it.) I went to my corner clone PC store - Vancouver is blessed with a large number of small stores that home-build PCs. While they don't deal with Macs directly, now that Apple uses standard RAM, hard drives, and the like, my local shop can provide usable upgrades for my Macs. It took them a few days to get me another 500 GB laptop drive, but they shared their experience - lots of people, they reported, are having issues with 7200 rpm laptop drives. Their suggestion, which I followed: stick with 5400 rpm drives. Cost of a 5400 rpm 500 GB Toshiba drive: CDN$108 plus tax. I was able to pick it up after work yesterday. Once again, installing it into the MacBook was quick and easy. From there, I went on to boot to my Mac OS X 10.6 "Snow Leopard" installation DVD and run Disk Utility to initialize the new drive, letting me install OS X onto it. Total time: about 45 minutes. When the system restarted, it asked if I wanted to restore from another Mac or from a Time Machine backup - before the drive crash, I had been backing up regularly over WiFi to a drive connected to my AirPort base station (see Things You Must Know to When Connecting a USB Hard Drive to AirPort Extreme). What I had never had to do, though, was actually restore from one of those backups. 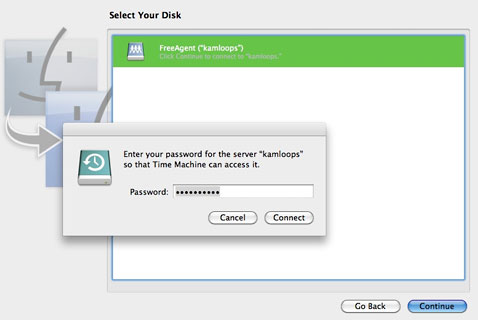 Working
across a WiFi network was going to be much slower than working with a
drive directly connected to my Mac - or even connected by wired
networking. (In retrospect, I suppose I could have plugged the MacBook
into one of the base station's ethernet ports for better performance.)
I don't think the backup created across the network would have been
usable if I'd plugged the USB drive directly into my Mac - Time Machine
stores backups created across a network differently than those created
on a directly connected drive. (If I'm wrong about this, I hope a
reader will correct me - I didn't try it to find out.) Working
across a WiFi network was going to be much slower than working with a
drive directly connected to my Mac - or even connected by wired
networking. (In retrospect, I suppose I could have plugged the MacBook
into one of the base station's ethernet ports for better performance.)
I don't think the backup created across the network would have been
usable if I'd plugged the USB drive directly into my Mac - Time Machine
stores backups created across a network differently than those created
on a directly connected drive. (If I'm wrong about this, I hope a
reader will correct me - I didn't try it to find out.)But nicely, the Migration Assistant had the option to connect to a networked Time Machine drive - it asked for the name and password for my AirPort Extreme (luckily I knew these!), then showed my backup disk. To actually access it, I had to know the password for my networked backup disk - again, I knew this one, too. After that, it was easy, if not particularly speedy. It took about 5 minutes for the software to identify what was available - user accounts (and associated documents, etc.), applications, settings, and "other" - much of the time, I think, is in adding up the space required for all the various sets of files, especially since Time Machine keeps multiple copies as the system evolves over time. 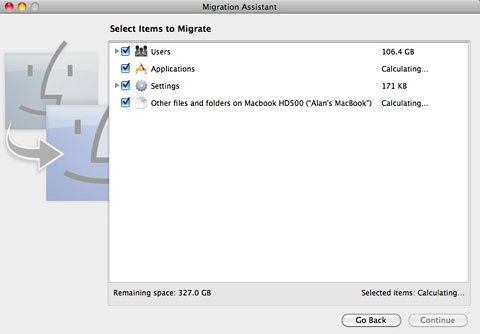 It's not granular - you can choose to restore
Applications, for instance, but not which applications you want to
restore. Note: I did all this the first time my MacBook restarted with
the new hard drive and its fresh Snow Leopard installation, but you can
use the Migration Assistant (in the Applications/Utilities folder) to
do the same thing at any time. It's not granular - you can choose to restore
Applications, for instance, but not which applications you want to
restore. Note: I did all this the first time my MacBook restarted with
the new hard drive and its fresh Snow Leopard installation, but you can
use the Migration Assistant (in the Applications/Utilities folder) to
do the same thing at any time.Like I said, not particularly speedy. About 100 GB of documents, music, videos, and such, another 17 GB of applications. Settings and "other", a mere trifle. First estimate - about 8 hours to install. Soon it was claiming 11 or 12 hours. I went out for the evening and came back with it promising just 4 more hours, so I went to bed. When I woke up, it was done - just the way everything had been the day before the crash five days earlier. But to the guy who emailed me after last June's article about connecting a USB hard disk to an AirPort Extreme base station, I now know that you can restore a drive backed up that way. I learned the hard way. But thanks to good design on Apple's part, it wasn't too hard. Still, I hope I don't have to do it too often. |
|
Alan
Zisman is a Vancouver educator, writer, and computer
specialist. He
can be reached at E-mail
Alan
|
|
|
| |
