The
fancy animations you see on the web are made with expensive, hard to
learn tools like Macromedia Flash. Smaller, simpler animations, called
Animated Gifs can liven up a web page, and can be made using free
tools.
Here's
an
example of an Animated Gif, taken from the anti-smoking website: Cigarette.com

Animated
Gifs
are made out of a series of still pictures (frames), all with 256
colours, and the same size, saved in the Gif format. Gif animation
software lets you arrange the frames in order, set the timing at which
they will play, and whether they will loop forever, or just play once
when displayed.
There
are a
number of shareware and commercial Gif Animation programs available at
a range of prices... we're going to use the small, free, and simple: UnFREEz.
If you don't have a copy, click on its name to download it (You will
need an unzipping program to open it up-- there is no install; just
double-click on the unzipped file to run it... note, however, that
UnFREEz and in fact, this tutorial, is aimed at Windows users. Mac
users may want to check out the freeware: GifBuilder
(GifBuilder
Carbon for OS X) or HVS
Animator ).
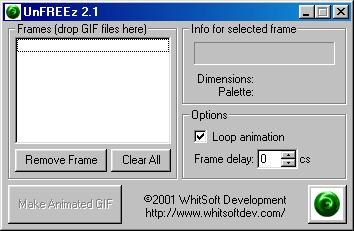
When
UnFREEz
starts up, it looks like this:
To
use it to
create an animation, you need to create your series of frames, saved in
GIF format, in some paint program, such as Windows Paint (which will
open and save in Gif format if you have Microsoft Office installed), or
higher end programs such as Photoshop. Alternatively, you could use
KidPix or Windows Paint to save a series of graphic files in Windows
Bitmap (BMP) or other format, then use a free graphics conversion
program like Irfanview
to
covert each to Gif format.
When
you
have your frames, locate them in My Computer or Windows Explorer, and
drag their icons, in the order you want them to be played, into
UnFREEz's Frames window. When you're done, click the Make
Animated
GIF button, giving your file a name and location. (Hint:
If you
want to use your animation on the Web, don't use any spaces in the file
name!)
You
can
experiment with the Frame delay setting to make
your frames run
faster or slower-- slower is more choppy, but faster may be too fast!
Viewing
your animation
You
may have
noticed that the bare-bones UnFREEz program doesn't actually show you
how your animation looks. You will need to view it in something
else.The multitalented, free Irfanview
works fine for that.
Making
your
frames in Paint
First,
make
sure that your copy of Windows Paint can open and save in Gif format.
(If it doesn't, you can still use it to create the frames, using
Irfanview or other software to convert from BMP format to Gif). Open
Windows Paint (you'll find an icon in the Start
Menu/Programs/Accessories menu)... go to the File/Open
menu,
and
click to see the Files of Typedrop-down list... see
if you have
this choice:
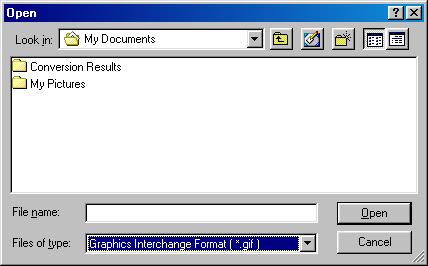 If
so, you're
can proceed without needing any extra conversions. If not, go ahead
anyway-- just remember, you'll need to convert your frames to Gif
format (using Irfanview or other software) before using them with your
Gif Animation software.
If
so, you're
can proceed without needing any extra conversions. If not, go ahead
anyway-- just remember, you'll need to convert your frames to Gif
format (using Irfanview or other software) before using them with your
Gif Animation software.
Before
you
start painting, pick a size for your animation. In general, smaller is
better... small animations load over the Internet much quicker. In
Paint, click on the Image/Attributes menu. You'll
see:
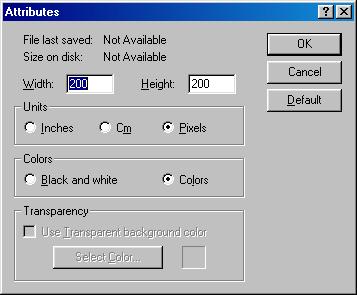 Set
your units
to Pixels (picture elements-- dots on the
screen)... just to give you something to judge by, the following image
is 200 x 200 pixels (and is pretty large for an animated Gif:
Set
your units
to Pixels (picture elements-- dots on the
screen)... just to give you something to judge by, the following image
is 200 x 200 pixels (and is pretty large for an animated Gif:
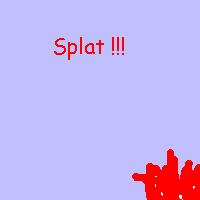 Once
you've set
your size, feel free to create your first frame. Save it, if possible,
in Gif format.I would suggest including a number in your filename to
indicate which frame it is: Frame1.gif, for instance.
Once
you've set
your size, feel free to create your first frame. Save it, if possible,
in Gif format.I would suggest including a number in your filename to
indicate which frame it is: Frame1.gif, for instance.
Here's
a
nice option-- once your frame is saved as a Gif, if you go back to the Image/Attributes
menu, you'll see that the Transparancyoptions--
greyed out and
unavailable in the picture above, are now available... checking the [
] Use Transparent Background Color option lets you select a
color--
anything in that colour will be transparent when the Gif is displayed--
that's a nice feature since it allows you to use that still or animated
Gif on webpages with any background colour, and not see a coloured
square for the Gif. Notice how that is used in the smoking skull at the
top of the screen.
After
saving
Frame1, click the File/New menu item, to continue
with the next
frame. The Image/Attributes will remain the way you
set them... though you'll have to re-pick a transparent colour for each
frame. Obviously, all the frames in your animation need to be the same
size. Aim to have at least a dozen or more frames to have an effective
animation.
A
note
about saving in Gif format:
Gif
format is
limited to 256 colours. As a result, if you are trying to use a
photograph as part of your image (whether a still image or an
animation), when you save it as a Gif, the photograph will look less
life-like. Look at the skull image at the top of this page-- at first
glance, it may look good, but as you look closely, you may see how the
colours were reduced.
(You
can paste
photos into your frames, and then draw on top of them, as was probably
done in creating the smoking skull).
Conclusion:
Having
to
create frames one at a time in a program like Windows paint can be
tedious... but using simple programs like this, and free software like
UnFREEz, students or other non-professionals can create surprisingly
effective animations. Just remember to keep them small! -- February 19,
2002
Alan
Zisman is a Vancouver
educator, writer, and computer specialist. He can be reached at E-mail Alan