The center icon
(looking like a
<
) in the
blue screen capture (also from the Photos
app) is the
Send-To
icon. It
will also appear in lots of apps.
It lets you send something - in this case a photo - to your choice of a
variety of places. If I tap it in the Photo app, I see:

I
can, for instance,
tap on the Gmail icon which will open that app, create a new message,
and insert my photo in the body of the message. I just have to enter
the name or email address of my intended recipient, type a subject and
maybe a few words of text and tap 'Send'. Or I could tap an icon to
send my photo via Facebook Messenger or in the mail Facebook program -
the Send To options will vary depending on what apps are installed on
your phon. Very handy!
(Sometimes, you'll need to tap the
3
vertical dots icon and pick
Send To from the
pop-up menu).
There are other frequently-used icons - the
trash can
icon (also visible in the blue screen-capture image),
for instance may be self-explanatory. In the Photos app, for instance,
tapping it will ask if you want to delete the photo. In the Gmail app -
or other email app, it will appear when a message is open or
selected - tapping it will delete the message. A trash can will appear
when you're uninstalling an app.
The
keyboard
- Smartphones and tablets have 'virtual keyboards' that pop up when the
device thinks you want to type some text. As is often the case with
Android, different device models feature different keyboards - and you
can install replacement keyboard apps, so your keyboard may look
different. See:
Best
Keyboards for
Android - the images below are of Google's
Gboard keyboard,
installable from the Google Play Store.
(As well,
you can connect a physical keyboard using a Bluetooth wireless
connection or even a USB cable and an adaptor).
Some things to note:
If you rotate your phone 90 degrees - to 'landscape'
orientation - the keyboard will become wider which may make it easier
to type - but you'll see less of the screen.
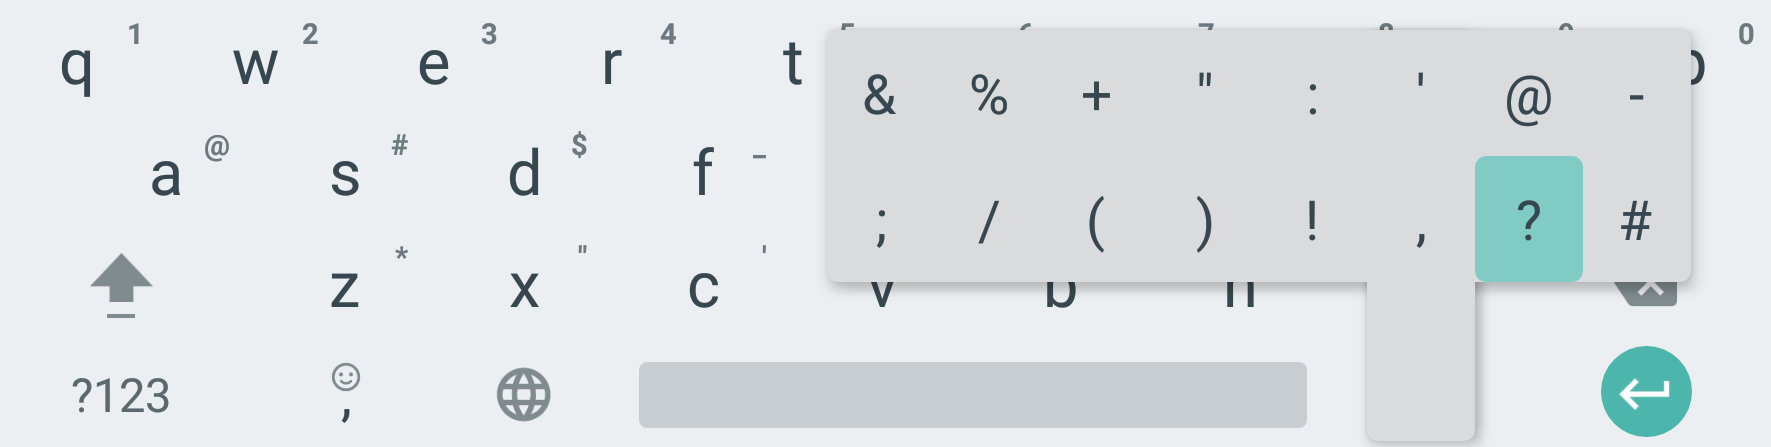 Alternate characters:
 Looking
for
'alternate' characters - accented letters,
punctuation, etc? Try a long-press on a key - alternates may come up!
Then tap on your choice. Note the small numbers and characters above
many of the keys - they're only some of what I can get with a
long-press. Here's what I got by long-pressing the 'period' key:
Similarly, long-pressing on the letter 'e' (for instance) offers a
choice of various accented e's. Tap on the one you want and it will
appear.
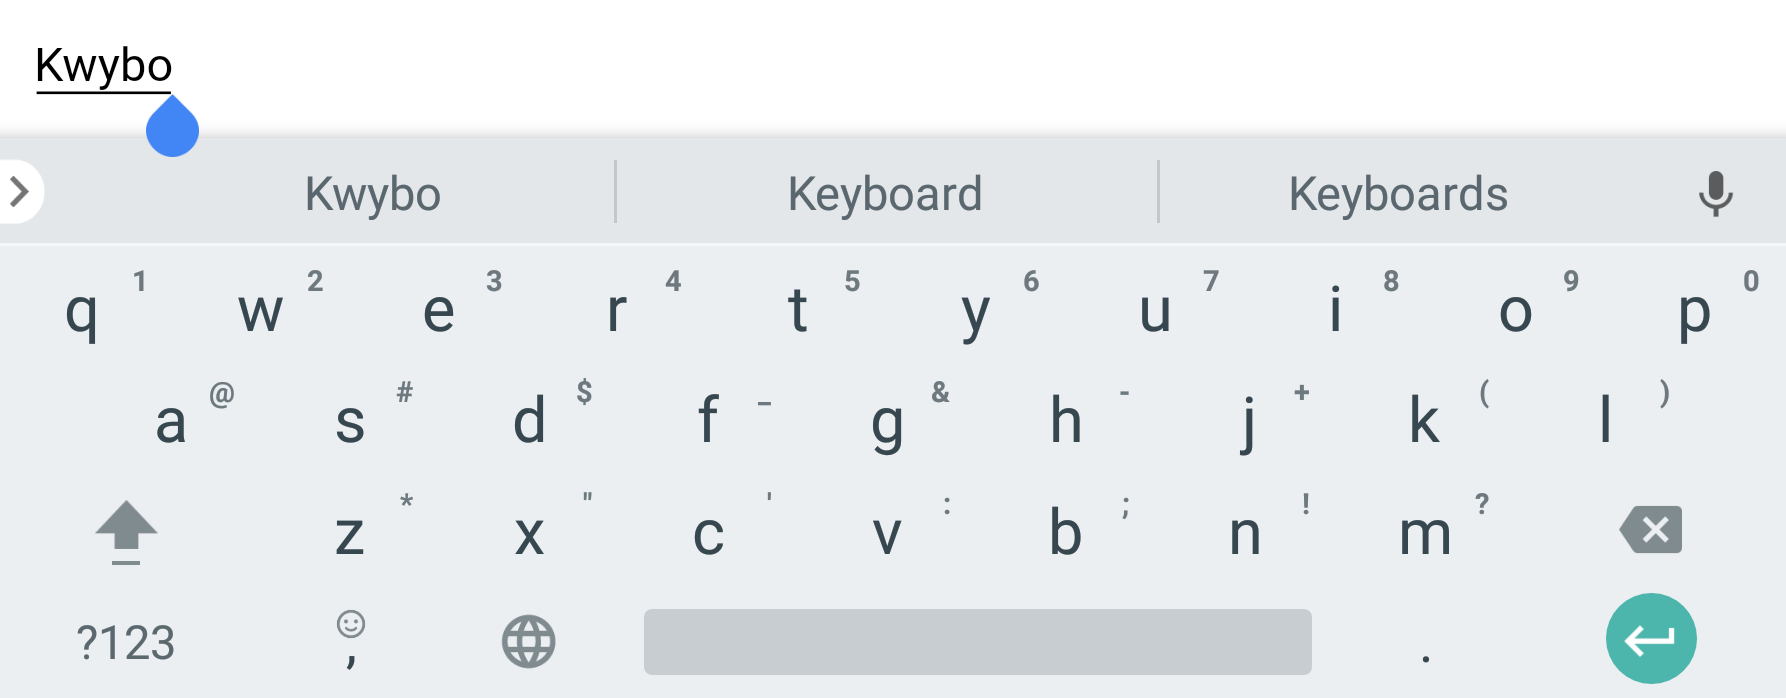 Auto-correct:
As you type, above the keyboard characters you may see
auto-correct
suggestions. If an option is in boldface, it will be inserted by
default as soon as you tap a space. Pay attention to the bold
auto-correct suggestions - they may
replace something you meant to type with something very wrong! At the
same time, if it guesses the right word before you finish typing, you
can tap it to insert it, speeding up your typing.
Notice below
that auto-correct guessed the word I meant to type ('Keyboard') before
I finished typing it, but wasn't sure enough to put its guess in
boldface.
I could tap on its correct guess to insert the word or finish typing
with my mistake - by then, it would be surer of its guess and when I
pressed space, it would correct my typing. If it makes a wrong
auto-correction, pressing the 'backspace' key (the arrow with the [x]
on it above the Enter key) will undo the auto-correction.
Skating with your finger:
Some
keyboards, including Gboard,
Swiftkey, and Swype offer an option of 'swiping' or 'glide keyboard'
instead of tapping to type. To do that, you use your finger to sort of
'ice-skate' over the letters that spell out your word - when you lift
your finger, the keyboard inserts what it things is the whole word.
Some people find that faster and more efficient - and a fun way to type.
More - 9
typing tips every
Android and iOS user should know
Google account
features and services you may not be using
By setting up an Android phone you set up a Google account whether you
realized it or not - even if you don't use Google's Gmail for your
email. These give you a large amount of storage for free that you might
as well be making use of - and they can be used to access files,
photos, music, and more on your phone or tablet, your computer (Windows
or Mac) at home, work, or travelling, and to share files, photos (etc)
with colleagues, friends, and family (including on Facebook or other
social networks).
You can use the
Gmail
app with
a Google Gmail account but also with email accounts from other
providers. It connects with email addresses stored in Google's
Contacts app - and
phone numbers stored in Contacts are available to the
Phone and
Messages apps. If
you use Google's
Chrome web
browser on your computer - and log into your Google account in Chrome -
bookmarks, search results, and saved passwords are available if you
Chrome on your phone or tablet. The
Photos
app and
Play Music
app on your phone and tablet combine photos and music store on your
device with photos and music files saved in your online Google cloud
storage. All of this is optional, but they make your Android device
easier to use and more productive - as long as you're prepared to share
your files, passwords, and other information with Google.
You may interested in using these optional Google cloud storage
features:
- Google Drive can be
used
to store all sorts of documents and files; you can create new documents
and edit word processor, spreadsheet, and presentation documents using
online tools with installing an office suite on your device or
computer. You get 15 GB for free (shared with Gmail) - more can be
purchased: 100 GB for $1.99/month, 1 TB for $10/mo.) Don't store
photos, music, videos here - there are better ways! More: see - How
To Use Google Drive on Android: A Beginner's Guide
- Google Photos
can be set
to automatically upload photos taken with your device's camera (and
delete the original to free up limited storage on your device) - you
can store an unlimited number of photos for free (with an upper limit
of 16 megapixels in photo size and some compression or buy storage for
uncompressed photos of any size). You can create albums,slide shows,
and more - and share individual photos or albums. More: see - Google
Photos: Ultimate Guide
- Google Play
Music
can be
used to store up to 50,000 music files - I copied 60 GB of music from
my home computer - making it accessible on your device whenever you
have an Internet connection. Google wants you to subscribe to their
(paid) streaming music service - you don't have to! More: see the PC
Magazine review Google
Play Music. If you are using iTunes on your
computer or were using an iPhone or iPad, see: How
to import your iTunes music library to your Android device using Google
Play Music
Note that it's valid to have privacy
concerns about storing
documents, photos, etc in Google's online storage services - or in any
cloud service.
If you're concerned about Google having access to your
personal information and data, you might take a look at: A
Guide to Using Android Without Selling Your Soul to Google
Are you getting
the most out of your Android phone or tablet?
Your Android phone can be used as a camera and photo and video viewer,
as a music player, and even as a flashlight in a pinch. And yes, it can
be used as a phone and to send text messages. You can go online to view
webpages, read and send emails, go on Facebook and more.
See:
What would the stuff your smartphone can do
cost in
1985?
But you can also be using it on the go for maps and directions, to
check when your bus is due to arrive, and even to pay at a parking
meter (at least in Vancouver). To do these things, though, you need an
Internet connection on the go - but many of us assume that we either
don't need or can't afford to have 'data' on our plan with our mobile
provider. Certainly there was life before smartphones - and you can use
your smartphone in many useful ways without a data plan and only going
online when you're connected to a WiFi network.
But having mobile data available makes your smartphone much more
useful. You can catch up on your email on the bus! Get directions when
lost. Refresh your parking meter when time runs out while you're in the
mall. And lots more!
As long as you're not watching online video on the go, you don't need
much mobile data - a relatively small (and relatively inexpensive)
amount of data will not be an expensive addition to your monthly cell
phone bill. Give it a try!
Quick
access to frequently used settings
|
Most Android
devices offer
easy access to commonly-used settings - things you might want to get to
quickly, like turning Airplane Mode on or off, connecting to a WiFi
network, or more.
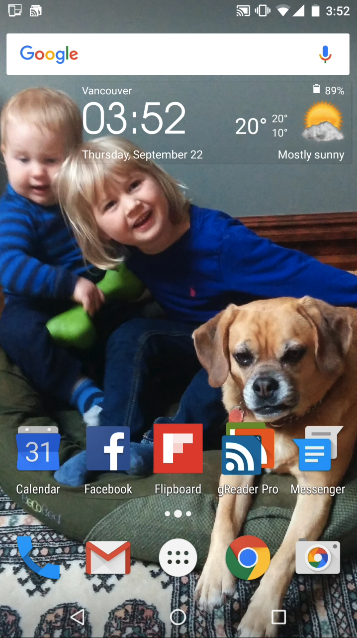
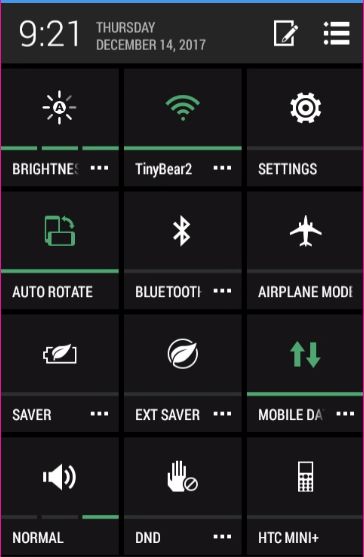
To get to the Quick Settings options, pull down from the top. You'll
see notifications. On my older HTC Desire 510 phone, there's an icon in
the top right above the notifications list - tap on it and you'll see
the Quick Settings as shown to the left.
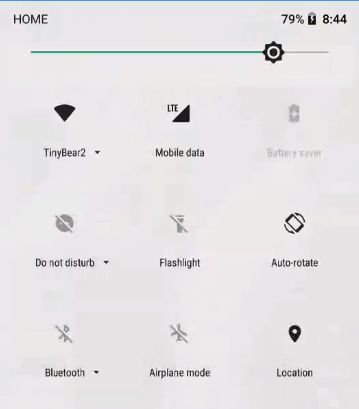
On my newer Nexus 5x phone, pull down from the top to show the
notifications - then pull down again. This time you'll see the Quick
Settings as shown to the right. (There are a couple of other options on
a second page if I swipe from the right).
In both cases, you'll see options to adjust the screen brightness for
more visibility in bringht sunlight or to save battery power. You can
quickly turn WiFi on or off or connect to a different WiFi network.
Turn the Bluetooth radio off - and leave it off unless you need it -
it's just wasting battery power otherwise. Turn 'airplane mode' on when
you board a plane and turn it off again when you land (maybe!). Disable
auto-rotate if you find it annoying.
(For all these plus lots more settings, the Settings app offers lots of
options - we'll look at that in detail in Part 2.)
|
|
Optimizing Battery Life -
Hopefully your smartphone battery lasts you through a whole day or
more. If that's the case, you're probably okay and can just recharge
your
phone every night while you sleep. (Yes, it's okay to charge your phone
before the battery is fully discharged - modern batteries no longer
suffer from a 'memory effect' where charging a partially dis-charged
battery will affect the battery's life).
The biggest drain on your battery is the screen - that's part of the
reason why modern smartphones, with big bright screens, tend to have
shorter battery life than older feature phones with small screens. (As
well, we're more likely to use a smartphone more and in more different
ways than we used older, less capable styles of phones). So what can
make the biggest difference in battery life is turning down your screen
brightness. That's a trade-off though - a dimmer screen is harder to
view. Find a balance - not too bright, not too dim. Your phone may want
to automatically make your screen brighter or dimmer depending on the
level of outside light. Experiment with having this setting on or off -
see if you notice a difference in battery life.
Turn off radios that you aren't using - no Bluetooth devices? Turn off
Bluetooth (there may be a Quick Settings icon for that - see above).
Not using location? Turn it off. Going a while without connecting to
Wi-Fi? You get the picture.
See:
Tips
and myths about extending smartphone battery life and
How
to see which apps are draining your battery and
6 common battery myths and
This
Is How You Can Boost Your Smartphone Battery Life!![Guide For all Phone
2021]
One more thing - the standard Facebook and Facebook Messenger apps are
real battery wasters. Instead, I recommend you use Facebook
alternatives
Swipe for Facebook or
Friendly).
Note that over time, your battery will no longer hold as much charge or
last as long - this is normal (though unfortunate!) and is one the
major reasons people decide to get a new phone. If your battery used to
last all day but no longer does, maybe it's time for an upgrade. See:
5 signs that you’re ready to upgrade your
smartphone.